Nerf bars are a polite way to make fun of other cars with full bumpers.
....
Wednesday, November 5, 2008
Axle Follies
My 58 f100 came to with a huge set of meats on the back- pretty killer, huh?
They're so wide that they hang outside the wheelwell....
Well, those are actually 225/75/15 whitewall cheapies.......and that's the WRONG axle in my truck.
After cleaning off the tag, and running the numbers- it ends up being out of one of these bad-boys.
<<<
Very cut-som, indeed.
A guy from the HAMB came and got this old '68-'71 E100 bone for like $100, before I could put it out of it's misery and bury it.
The new Pig
So I haul a new rearend home- this time from a 1957 f100.
Turns out to be a 3.25 open gearset.
A quick rebuild and limited slip diff install are next.
Tuesday, November 4, 2008
Git Low
There are a couple different ways to take the "Green Acres" right out of your 57-60 F100, if you so desire.
First off:
1) Remove the spare tire from inside the bed.
then....
...Do what the man says:
2) Decrease overall ride height 6-8 inches:
OK- the first can be done with your wife's tool kit in a few seconds, the latter- well, it can be more like a second job. Of course it depends upon your knowledge and skill level. Let's just say that it's been a learning experience so far.
There are several different ways to approach this- I'll cover each one, including Pro's and Con's of everything I've learned so far:
IFS
First things first- this ain't happening. For a couple different reasons:
1) This truck isn't being built for road racing, or for "layin' rocker"
2) It's nowhere near as cheap or easy as everyone thinks, to pull off CORRECTLY.
3) If I wanted a '96 F-150, or a Volare, or a '70-'81 Camaro, I'd go buy one.
With that out of the way, here's some choices for lowering it "old skool".
Dropped mono Leafs
First, and by far the easiest.
You can get these from Sacramento Vintage Ford pretty reasonably. I think for abut $400 per axle.
Pro:
1) Quick and relatively easy.
2) You can choose a from couple differently sized drops.
Con:
1) Makes for a "bouncy" ride.
2) Forget about actually using your truck as a truck- hauling potential is about a "2" on a 1-10 scale.
3) Possible bump Steer/Steering geometry issues.
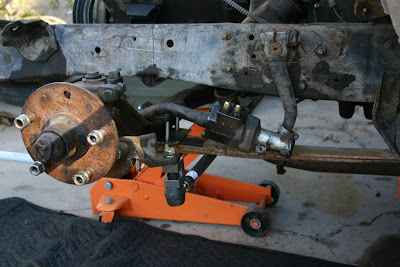
Here's a photo of a mono leaf setup. Looks like about 2" of suspesnion travel before bottoming out. This is with no front end sheetmetal or driver (another 400-500 lbs):
Dropped Tube Axle
Commonly available drop axles are actually created for the '53-'56 F100, and then modified slightly for the '57-'60 (the 57-60 has a 1/4" wider leaf spring).
Here's a caveat of sorts- the the stock 57-60 axle geometry has a 1.0" drop over the 53-56 axle. So....all of the 3.0" dropped axles available will only drop your Fridge by 2.0".
Pro:
1) The "Right" way
1) Gives a "true" geometrical drop (not just a compromise in suspension travel)- steering geometry issues resolved by using a relatively inexpensive "Tie Rod Drop Kit".
2) You get a new axle.
Con:
1) Pretty pricey. Kingpins, U-Bolts, Tie Rod Drop Kit, and Axle will run you almost 6 bills for a 2.0" drop.
2) Installation not easy.
Classic trucks magazine did a feature on this kind of drop:
http://www.classictrucks.com/tech/0610cl_ford_suspension/index.html
http://www.classictrucks.com/tech/0611cl_1960_ford_f100/index.html
Dropped I-Beam Axle
You can have the factory I-Beam axle "Dropped" by a drop axle service. There are a couple of them around in California and Arizona. Price is comparable to new dropped tube axle.
(I hear that you can safely drop a stock axle to 4.0". HINT: I'm guessing that this is common wisdom for a 2600lb open car, and not 3600lb truck.)
Pro:
1) I'd call this a reasonable price to pay for lowering.
2) Again- a "true" drop, but you're on your own in resolving bump steer issues.
Cons:
1) No guarantee that you will ever get your front end aligned properly, or have a tight hole for kingpins.
2) Same gig as tube axle as far as Installation.
Here is a another great link from the HAMB:
http://www.jalopyjournal.com/forum/showthread.php?t=92817
"Trick" the stock leaf springs
You can do this three ways- by removing one or more of the seven leafs in each leaf spring, by having the spring eyes "reversed", or by having the springs de-arched.
OR, a combination of all three:
There are two basic approaches to removing leaves :
1) Removing #2, or #2 and #4 combined. These are both within the leaf spring "pack"(#1 being the longest leaf with the eyes in it). This allows you to keep the bottom helper springs intact. The exact effect of this as far as modifying ride height/spring rate is a guess at this point.
2) Removing the helper springs, #7, or #7 & #5 combined.
Same applies.
The last two are work for your local spring shop;
Reversed Eyes:
Just from looking at the diameter of the eye on a 57-60 leaf spring, I'm thinking that you will get a bout 1.25" drop from a reversed eye- all other factors being the same, including the arch of the spring.
Valley Spring service in Phoenix,AZ reveresed the eyes on both front springs fro about $65.
De-arching.
No problem. The same shop will de-arch for a little extra $$.
Git Low: Cont'.......
Flip the axle(s)
This is common practice for cars/trucks with solid rear axles, but doing it in front is a whole 'nother piece of work altogether. It will get you a solid 6"-7" inches of drop in front, but the fabrication is no joke.
I mocked up this setup with my F100 earlier this year, and found that it wasn't the apporach that i wanted.
You'll have to
1) move the steering box up & fab a new bracket
2) re-position the steering column
3) watch for interference with the frame and oil pan from both the axle itsself and the tie rod.
I'm going to guess that it takes some pretty good trickery to permanently resolve the bump steer issues with this.
4) You will also need to C-notch & box the frame.
Here's what my F100 looked like with with both axles flipped,
and 3 leafs removed in front.
Here is an excellent tech link from the HAMB:
http://www.jalopyjournal.com/forum/showthread.php?t=153730
"Z" the Frame
I left this for last cause it's probably the last thing that anyone thinks of with all the other options available. It made the most sense to me because it allows me to get 2.5" out of the frame- retaining stock travel and geometry, another 2" with dropped axle, and 3" out of the springs.
This is essentially a 7.5" Bolt-on drop, that only sacrifices 3" of suspension travel, and retains steering geometry.
I will be fabricating adjustable rear spring perches that will retain the caster attitude of the axle should I ever want to return to near stock ride height ( with longer shackles in front)
Monday, November 3, 2008
Steered Wrong III: Parts is Parts
The 1957-60 F100 steering setup has another small inherent problem- the center tie rod. The original is a hollow unit that likes to bend under pressure, absolutely destroying any sort of front end geometry when you need it most.
Classic Performance Products makes a "heavy Duty" replacement unit that is guaranteed not to bend- here it is with new Tie rod ends:
Finishing off the new steering setup are these machined C-blocks from Classic performance- they effectively "drop" the steering geometry to avoid bumpstop (from the tie rod hitting the oil pan among other things) when lowering the front suspension More on that later....
The existing power steering pump has that unmistakable 1970's Impala look to it, and is most likely a turd- along with every other component that came on the truck.
So since I'm going for an early sixties 'Vette motor swap look, I got an older style (pre '66 Impala/Biscayne) pump from rockauto.com:
Steered Wrong, cont': Getting it Right
Out with the old, right?
The new system will include the following:
1) 1980-1987 Toyota 4x4 Power Steering Box
2) GM pre-1966 power Steering pump
3) TWO hoses: One pressure side/ One return side
4) Fabricated Pitman arm
5) Fabricated mount for steering box
Finding the Right Box
Toyota used a push/pull steering setup common to early cars/trucks on it's little 4WD trucks from 1980 to 1987. Some Late '84- up trucks have an IFS and use a different box, so it's important to distinguish between the two boxes.
This particular Toyota box is popular for rock-crawlers and street rod applications, and remanufactured units are BIG $$$, so they are getting increasingly harder to find. There are, however rebuild kits available.
After visiting BAP Import parts and hitting the local yards here in Mesa, AZ, I was forced to resort to the "internets" to locate the right unit.
I should have known better- but the price was right. After a lengthy phone conversation about "custom application, and late 1984/ early 1984"--for about $100, a yard in California shipped this to me:
I have no idea what this thing even is-- "TOYODA"??
"Hrrrmm-yes- wrong steering box you have. Yes- but stop trying, you cannot"
It has a weird, staggered mounting pattern that would require some amount of weeks for someone like me to fabricate a mount for- SNAP!!
A call to a yard in Thatcher, AZ and a nice lady with knowledge of the internet, got me this box from an '83 4WD:
This is the correct box. Notice the single, flat mounting mounting flange and LH side Pitman arm mounting. That''s cash-money.
_______
Making it Work
The correct Toyota box will bolt right up to the '57-'60 F100 frame...with some help. A company called Mid Fifty, just outside of Kingman, AZ, makes a kit that mounts allows use of the Toyota box.
The kit sells for $285.00, and comes with four parts:
1) A fabricated BOLT-ON steering box Mount.
2) A fabricated pitman Arm that connects the Toyota splined output shaft to the Ford steering linkage.
3) A Flaming River universal/coupler joint that mates the Toyota (11/16" -36) splined input shaft to a typical GM style/aftermarket (1.0" DD column)-- (they also have couplers that fit the original steering shaft).
4)New Sector Nut.
This is the parts collection before starting-- I included a shot of the old (Toyota) Pitman arm for reference. Note that the mounting bracket is a bolt-on unit, and is very heavy duty.
Tech Links::
http://www.ford-trucks.com/article/idx/5/218/article/Toyota_Steering_Box_Swap_For_19481960_Trucks.html
Style Points: Billetproof
Style Points: Billetproof, Cont'....
Needless to say, progress has been slow on the '58.
With reasonably warm temperatures coming to the low desert it seemed that some inspiration, with a capital "$$", was in order.
So I sent away for a set of custom made wheels and tires.
These are different than the "cut-som" that you will see referenced at length throughout this project....but they're definitely billetproof.
Tires
The tires came from Diamondback Classic Tires in Conway, S Carolina. They molded the sidewall design to my specs in 16"s. Dual pinstripes came out in '61 and haven't been around for awhile, so custom rubber was the only option here. I was stoked to see how nice of a job they did. The price- let's say that it's definitely enough to keep out the riff-raff.
Wheels
The wheel design has been around for probably40+ years- pretty simple stuff, but Earlywheel in Morroy Bay, Ca makes them to order and ships the same day. This means that if you call early enough in the AM, you can have custom diameter/backspace wheels shipped to you the same day. Pretty cool.
These are 16x7' s in back/ 16x6's in front with 4" and 3.5" backspace respectively.
Sunday, November 2, 2008
Bodywork- Getting back into it.
Well, with a couple trips to the sandblaster and a gallon of epoxy primer sitting around I found myself grabbing anything loose to take over for stripping when i'd go.
The tailgate was an easy choice-- easy to take off and looked like heck with someone else's raw bondo all over it.
Came back clean
except for one spot that needed cut out:
Here it is done- ready for primer:
Next up is a cancerous core support:
The tailgate was an easy choice-- easy to take off and looked like heck with someone else's raw bondo all over it.
Came back clean
except for one spot that needed cut out:
Here it is done- ready for primer:
Next up is a cancerous core support:
Motor
While the 400 SB that came in '58 is in the hopper for a rebuild, I've had time to start compiling all of the essential bolt-on parts.....
Style Points
Approaching things with a distinct of presence of mind, tends to give them a sense purity and resolution.
OK- I stole that from someone else. Actually, I didn't steal it- I imagined that I was dreaming and Dr Ferdinand Porsche came to me with an important message about my truck... and recited it to me.
That's right.
Either way--it definitely applies here. Sorry, but I can't stand when I see a car at a car show and it has that look......you know, that ding-dong jumble of mismatched "dress-up" items. Some of the 60's/70's stuff, mixed with all the same cheap chinese made 80's/90's knock-offs.
Being no snob- I hunt bargains with the best of them, but being in design for a living- it just needs to have a cohesive "theme"- that's all.
The idea here is to carry off what will look to most people, like an early 60's corvette motor swap. Way back in say, 1962, aftermarket speed parts were VERY hard to come by. What most "rodders" did then was to hunt junk yards for entire motors to swap in. Of course, the small block chevy would have been the most popular- and the Vette motor the most desired.
Cal Custom/Mooneyes
Understanding that having "Chevrolet", or "Corvette" script valve covers in a Ford truck might be immediately kind of lame, I opted to go for the next better thing. Original style Cal Custom valve covers.
the first set I bought off ebay looked really nice-- but had 70's/80's style PCV provisions smack-dab in the top.......... and looked condemningly like knock-offs from the orient, after having them in hand:
--not liking these turned out a good thing- as i sold them for $25 more that i bought them for.
These are "real" Cal Custom Style valve covers:
(they need some detailing to step up the bling factor- but they're already Chevy orange)
I'm shooting to end up with something close to this-- monochromatic red block, with a little bit of polished/ chrome, and period correct painted slver/black parts.
Road Draft Tube
Most older motors SBC's that were made without a modern PCV system within the tops of the vave covers, used a "Road Draft Tube"in conjunction with a vented cap for the oil filler tube.
Here are some good HAMB tech links:
http://www.jalopyjournal.com/forum/showthread.php?t=61376
http://www.jalopyjournal.com/forum/showthread.php?t=269492
Installing a real Tube in a newer motor is alot of work and just plain unnecessary.
I plan to us the early style intake, with vented oil filler tube, and a discreet PCV hidden in the intake like this:
While initial planning and budget prompted a Craigslist '61-'63 327/300 HP cast iron intake, it's been canned for a Edelbrock Performer RPM unit. Why? Numerous hours on desktop dyno, and an expensive trip to Bailey's Machine shop in Mesa, AZ get me thinking more about most horsepower/torque per dollar.
The new intake will get the same treatment.
Subscribe to:
Posts (Atom)